文章目录
- 前言
- 一、Promise是什么?
- 二、Promise核心逻辑实现
- 1.基本原理
- 2.新建类promise类,传入执行器executor
- 3.传入resolve和reject方法
- 4.then方法的简单实现
- 5.完整代码及验证
- 6.代码改进
- 三.链式调用
- 1.链式调用实现的基本思路
- 2.then方法返回promise对象
- 3.resolvePromise方法
- 四.总结
前言
ES6无异于是当前前端必备的一项技能,而Promise又是ES6里面的重中之重,Promise充斥在我们代码的每一个角落。
一、Promise是什么?
promise是一种异步编程解决方案,主要解决了:当有先后依赖的多个异步任务时,层层嵌套的回调写法不灵活、容易滋生bug、且难以维护的问题。
目前我们使用的 Promise 是基于 Promise A+ 规范实现的。所以我们接下来的阶段也是基于Promise A+规范来写的啦。
不多废话,接下来让我们进入手写阶段。
二、Promise核心逻辑实现
javascript">const promise = new Promise((resolve, reject) => {
        resolve("success");
        reject("err");
      });

      promise.then(
        (value) => {
          console.log("resolve", value);
        },
        (reason) => {
          console.log("reject", reason);
        }
      );
1.基本原理
Promise 是一个类,在执行这个类的时候会传入一个执行器,这个执行器会立即执行
Promise 会有三种状态
Pending 等待
Fulfilled 完成
Rejected 失败
状态只能由 Pending --> Fulfilled 或者 Pending --> Rejected,且一但发生改变便不可二次修改;
Promise 中使用 resolve 和 reject 两个函数来更改状态;
then 方法内部做但事情就是状态判断
如果状态是成功,调用成功回调函数
如果状态是失败,调用失败回调函数
2.新建类promise类,传入执行器executor
class myPromise {
        constructor(executor) {
          // 初始状态
          this.state = "pending";
          // 成功的值
          this.value = null;
          // 失败的值
          this.reason = null;
          try {
            executor(this.resolve, this.reject);
          } catch (error) {
            this.reject(error);
          }
        }
3.传入resolve和reject方法
javascript">// 成功
        resolve = (value) => {
          if (this.state === "pending") {
            this.state = "fulfilled";
            this.value = value;
          }
        };
        // 失败
        reject = (reason) => {
          if (this.state === "pending") {
            this.state = "rejected";
            this.reason = reason;
          }
        };
4.then方法的简单实现
javascript">then(onFulfilled, onRejected) {
          if (this.state === "fulfilled") {
            onFulfilled(this.value);
          }
          if (this.state === "rejected") {
            onRejected(this.reason);
          }
        }
5.完整代码及验证
完整代码:
javascript">class myPromise {
        constructor(executor) {
          // 初始状态
          this.state = "pending";
          // 成功的值
          this.value = null;
          // 失败的值
          this.reason = null;
          try {
            executor(this.resolve, this.reject);
          } catch (error) {
            this.reject(error);
          }
        }
        // 成功
        resolve = (value) => {
          if (this.state === "pending") {
            this.state = "fulfilled";
            this.value = value;
          }
        };
        // 失败
        reject = (reason) => {
          if (this.state === "pending") {
            this.state = "rejected";
            this.reason = reason;
          }
        };

        then(onFulfilled, onRejected) {
          if (this.state === "fulfilled") {
            onFulfilled(this.value);
          }
          if (this.state === "rejected") {
            onRejected(this.reason);
          }
        }
      }
验证:
javascript">new myPromise((resolve, reject) => {
        resolve("success");
        // reject("err");
      }).then(
        (res) => {
          console.log(res);
        },
        (err) => {
          console.log(err);
        }
      );

可以看到这时,一个最简单的promise就实现啦。但大家有没有发现一个问题呢?上面的代码在调用then方法以后,只有fulfilled和rejected状态才会发生回调。
大家都知道,then方法是微任务,是要比宏任务先执行的,而promise状态改变是发生在resolve或reject之后的,那么如果我在setTimeout里去调用resolve,then方法就会在resolve之前执行,此时的状态为pending,那么我们的then方法不就没用了吗?
6.代码改进
上面说到,若处理同步任务时,then比resolve先执行,那么将会失败。
所以我们需要在then方法里面加上pending状态的回调,回调中将成功的回调和失败的回调对应添加到数组里,然后在状态改变时执行数组的每一项,代码如下:
javascript">class myPromise {
        constructor(executor) {
          // 初始状态
          this.state = "pending";
          // 成功的值
          this.value = null;
          // 失败的值
          this.reason = null;
          // 成功回调数组
          this.onResolvedCallbacks = [];
          // 失败回调数组
          this.onRejectedCallbacks = [];
          try {
            executor(this.resolve, this.reject);
          } catch (error) {
            this.reject(error);
          }
        }
        // 成功
        resolve = (value) => {
          if (this.state === "pending") {
            this.state = "fulfilled";
            this.value = value;
            this.onResolvedCallbacks.forEach((fn) => fn());
          }
        };
        // 失败
        reject = (reason) => {
          if (this.state === "pending") {
            this.state = "rejected";
            this.reason = reason;
            this.onRejectedCallbacks.forEach((fn) => fn());
          }
        };
        then(onFulfilled, onRejected) {
          // 声明返回的promise2
            if (this.state === "fulfilled") {
              onFulfilled(this.value);
            }
            if (this.state === "rejected") {
              onRejected(this.reason);
            }
            if (this.state === "pending") {
              this.onResolvedCallbacks.push(() => {
                onFulfilled(this.value);
              });
              this.onRejectedCallbacks.push(() => {
                onRejected(this.reason);
              });
            }
        }
      }
让我们来验证一下:
javascript">new myPromise((resolve, reject) => {
        setTimeout(() => {
          resolve("success");
        }, 0);
        // reject("err");
      }).then(
        (res) => {
          console.log(res);
        },
        (err) => {
          console.log(err);
        }
      );

成功!
三.链式调用
链式调用,也是promise里最重要的一点,解决回调地狱!
1.链式调用实现的基本思路
首先我们来验证一下之前写的代码能不能进行链式调用
javascript">const promise = new myPromise((resolve, reject) => {
        setTimeout(() => {
          resolve("success");
        }, 0);
      });
      promise
        .then((value) => {
          console.log(1);
          console.log("resolve", value);
        })
        .then((value) => {
          console.log(2);
          console.log("resolve", value);
        })
        .then((value) => {
          console.log(3);
          console.log("resolve", value);
        });

很明显,它不能。
我们要实现的话,应该先研究一下它的思路:
then 方法要链式调用那么就需要返回一个 Promise 对象
then 方法里面 return 一个返回值作为下一个 then 方法的参数,如果是 return 一个 Promise 对象,那么就需要判断它的状态
2.then方法返回promise对象
javascript">then(onFulfilled, onRejected) {
          // 声明返回的promise2
          let promise2 = new Promise((resolve, reject) => {
            if (this.state === "fulfilled") {
              let x = onFulfilled(this.value);
              this.resolvePromise(promise2, x, resolve, reject);
            }
            if (this.state === "rejected") {
              let x = onRejected(this.reason);
              this.resolvePromise(promise2, x, resolve, reject);
            }
            if (this.state === "pending") {
              this.onResolvedCallbacks.push(() => {
                let x = onFulfilled(this.value);
                this.resolvePromise(promise2, x, resolve, reject);
              });
              this.onRejectedCallbacks.push(() => {
                let x = onRejected(this.reason);
                this.resolvePromise(promise2, x, resolve, reject);
              });
            }
          });
          // 返回promise,完成链式
          return promise2;
        }
由代码可以看到,我们已经可以写出链式调用的伪代码了,现在我们需要编写resolvePromise方法,这里的resolvePromise函数是用来判断x的函数,若x是promise,取它的结果为新的promise2结果,否则直接作为promise2的结果。
3.resolvePromise方法
javascript">resolvePromise = (promise2, x, resolve, reject) => {
          // 若x=promise2,则会一直循环套用
          if (x === promise2) {
            return reject(new TypeError("不能相等"));
          }
          // 防止多次调用
          let called;
          // x不是null 且x是对象或者函数
          if (x != null && (typeof x === "object" || typeof x === "function")) {
            try {
              // 如果then是函数,就默认是promise了
              if (typeof x.then === "function") {
                x.then(
                  (y) => {
                    // 成功和失败只能调用一个
                    if (called) return;
                    called = true;
                    // resolve的结果依旧是promise 那就继续解析
                    this.resolvePromise(promise2, y, resolve, reject);
                  },
                  (err) => {
                    // 成功和失败只能调用一个
                    if (called) return;
                    called = true;
                    reject(err); // 失败了就失败了
                  }
                );
              }
            } catch (e) {
              if (called) return;
              called = true;
              // 取then出错了那就不要在继续执行
              reject(e);
            }
          } else {
            resolve(x);
          }
        };
这下就大功告成啦,让我们来试一试它能不能进行链式调用

果然成功的路不是一帆风顺了,让我们来看看它到底是个啥问题。
从报错信息得知,我们在promise2初始化之前就去调用它了。我们看一看then方法里的代码
javascript">then(onFulfilled, onRejected) {
          // 声明返回的promise2
          let promise2 = new Promise((resolve, reject) => {
            if (this.state === "fulfilled") {
              let x = onFulfilled(this.value);
              this.resolvePromise(promise2, x, resolve, reject);
            }
            if (this.state === "rejected") {
              let x = onRejected(this.reason);
              this.resolvePromise(promise2, x, resolve, reject);
            }
            if (this.state === "pending") {
              this.onResolvedCallbacks.push(() => {
                let x = onFulfilled(this.value);
                this.resolvePromise(promise2, x, resolve, reject);
              });
              this.onRejectedCallbacks.push(() => {
                let x = onRejected(this.reason);
                this.resolvePromise(promise2, x, resolve, reject);
              });
            }
          });
          // 返回promise,完成链式
          return promise2;
        }
      }
很明显!这个时候我们就要用上宏微任务和事件循环的知识了,这里就需要创建一个异步函数去等待 promise2 完成初始化。这里我们使用queueMicrotask来创建微任务。
javascript">then(onFulfilled, onRejected) {
          // 声明返回的promise2
          let promise2 = new Promise((resolve, reject) => {
            if (this.state === "fulfilled") {
              queueMicrotask(() => {
                let x = onFulfilled(this.value);
                this.resolvePromise(promise2, x, resolve, reject);
              });
            }
            if (this.state === "rejected") {
              queueMicrotask(() => {
                let x = onRejected(this.reason);
                this.resolvePromise(promise2, x, resolve, reject);
              });
            }
            if (this.state === "pending") {
              this.onResolvedCallbacks.push(() => {
                queueMicrotask(() => {
                  let x = onFulfilled(this.value);
                  this.resolvePromise(promise2, x, resolve, reject);
                });
              });
              this.onRejectedCallbacks.push(() => {
                queueMicrotask(() => {
                  let x = onRejected(this.reason);
                  this.resolvePromise(promise2, x, resolve, reject);
                });
              });
            }
          });
          // 返回promise,完成链式
          return promise2;
        }
我们给myPromise加上resolve和reject方法!
javascript">// resolve方法
      myPromise.resolve = function (val) {
        return new myPromise((resolve, reject) => {
          resolve(val);
        });
      };
      //reject方法
      myPromise.reject = function (val) {
        return new myPromise((resolve, reject) => {
          reject(val);
        });
      };
现在我们再来试一试能不能成功!
javascript">	myPromise
        .resolve()
        .then(() => {
          console.log(0);
          return myPromise.resolve(4);
        })
        .then((res) => {
          console.log(res);
        });

      myPromise
        .resolve()
        .then(() => {
          console.log(1);
        })
        .then(() => {
          console.log(2);
        })
        .then(() => {
          console.log(3);
        })
        .then(() => {
          console.log(5);
        })
        .then(() => {
          console.log(6);
        });
这里我用了一道非常经典的任务队列和promise题,来试一试我们的输出。
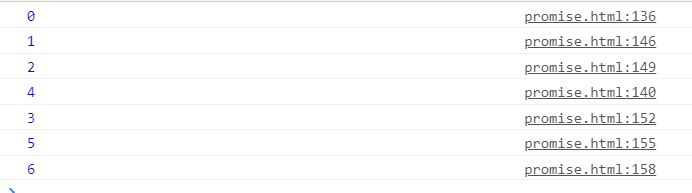
可以发现我们的链式调用成功啦!
四.总结
其实最后一道样例测试题是有疑问的,我使用了promises-aplus-tests测试我的promise是否符合A+规范,是通过的,但打印出来的顺序却和原生promise不一样,原生的是0123456,我的却是0124356。希望这个问题有大佬可以解答。
虽然这个问题还没有解决,但通过这次钻研,让我对promise的底层有了更深层次的了解,过程往往比结果更加重要,也希望大家能够讨论一下这道题,谢谢。


