react自定义属性渲染
First and foremost, if you wish to follow along with this article and possibly re-create the Google Map with ‘x’ amount of custom map markers…versioning is crucial. There are around three of four different Google Map React packages circulating around currently, to this I am not exactly sure why there are so many. Anyways, I use ‘google-maps-react,’ the documentation is extensive and the functionality of the map and marker components allows for a lot of flexibility and freedom.
首先,如果您希望继续阅读本文,并可能使用数量为x的自定义地图标记来重新创建Google Map,那么版本化至关重要。 目前大约有四个不同的Google Map React软件包中有三个正在流通,对此我不确定为什么会有这么多。 无论如何,我使用的是“ google-maps-react ”, 文档内容丰富,并且地图和标记组件的功能具有很大的灵活性和自由度。
As for the other packages, ‘google-map-react’ is updated a bit more frequently than it’s plural package partner, ‘google-maps-react.’ However, after extensive testing I have determined that ‘google-maps-react’ is more efficient for handling any amount of markers past 500. While ‘google-map-react’ may have more responsive marker cluster hover algorithms, it’s ability to render large (500+) amounts of markers pales in comparison to ‘google-maps-react.’ The last notable package, ‘react-google-maps’ is rather outdated, but not obsolete per se, I did not test this package.
至于其他软件包,“ google-map-react ”的更新频率比其复数软件包的合作伙伴“ google-maps-react”更新的频率更高。 但是,经过广泛的测试,我确定“ google-maps-react”对于处理超过500个的任意数量的标记更为有效。尽管“ google-map-react”可能具有更灵敏的标记簇悬停算法,但它可以渲染较大的与“ google-maps-react”相比,(500多种)标记数量显得苍白。 最后一个值得注意的软件包“ react-google-maps ”已经过时了,但它本身并不过时,我没有测试这个软件包。
地图组件 (The Map Component)
First, it will be beneficial to briefly cover setting up a basic map before adding any map markers. Again, the documentation is very straight-forward when it comes to setting up, simply import your components and return the map inside the render function as follows. I like to use a class component for the Map, and a pure component for the Markers(which I will explain later).
首先,在添加任何地图标记之前简要介绍一下设置基本地图将是有益的。 同样,在设置文档时 , 文档非常简单明了,只需导入组件并按如下所示在render函数中返回映射即可。 我喜欢为Map使用一个类组件,为Markers使用一个纯组件(我将在后面解释)。
import React, { Component } from "react";
import {Map, Marker, GoogleApiWrapper} from 'google-maps-react';export class BlogMap extends Component {  render(){
    return(
      <div>
        <Map
          google={this.props.google}
          initialCenter={{
            lat: 40.854885,
            lng: -88.081807
          }}
          zoom={15}
        >
        </Map>
      </div>)
}export default GoogleApiWrapper({
  apiKey: (YOUR_GOOGLE_API_KEY_GOES_HERE)
})(BlogMap)
The Map component takes a variety of props, but notably, ‘initialCenter’ will set exactly what location your map will open on. The ‘zoom’ prop also sets the initial zoom level(how much zoomed in) the set ‘initialCenter’ location will appear on the map. Do not forget to include your Google Maps Javascript API key to your GoogleApiWrapper, or pass the key into the Map component directly as an ‘apiKey’ prop. Lastly, all map controls are enabled by default.
Map组件具有多种道具,但值得注意的是,“ initialCenter”将准确设置您的地图打开的位置。 “缩放”道具还设置初始缩放级别(放大了多少),设置的“ initialCenter”位置将出现在地图上。 不要忘记将Google Maps Javascript API密钥包括在GoogleApiWrapper中,或者将密钥作为“ apiKey”道具直接传递到Map组件中。 最后,默认情况下启用所有地图控件。
Below is the Map component for my application, clyma. Note that not all of these props are necessary for rendering thousands of markers — this is only to show the flexibility of this package and it’s Map component.
以下是我的应用程序clyma的Map组件。 请注意,并非所有这些道具对于渲染成千上万个标记都是必要的-这只是为了显示此程序包及其Map组件的灵活性。
<Map
  ref={(map) => (this._map = map)}
  google={this.props.google}
  styles={this.state.mapStyle}
  disableDefaultUI={true}
  streetViewControl={true}
  zoomControl={true}
  mapTypeControl={true}
  mapTypeControlOptions={{
    position: this.props.google.maps.ControlPosition.TOP_CENTER,
  }}
  zoomControlOptions={{
    style: this.props.google.maps.ZoomControlStyle.DEFAUL,
    position: this.props.google.maps.ControlPosition.LEFT_CENTER,
  }}
  streetViewControlOptions={{
    position: this.props.google.maps.ControlPosition.LEFT_CENTER,
  }}
  initialCenter={searchCoords}
  center={this.state.coords}
  zoom={8}
>
渲染默认和自定义标记 (Rendering Default and Custom Markers)
Now that we have a map, we need to populate this map with some map markers! But how?
现在我们有了地图,我们需要用一些地图标记填充该地图! 但是如何?
import React, { Component } from "react";
import {Map, Marker, GoogleApiWrapper} from 'google-maps-react';export class BlogMap extends Component {render(){
    return(
      <div>
        <Map
          google={this.props.google}
          initialCenter={{
            lat: 40.854885,
            lng: -88.081807
          }}
          zoom={15}
        ><Marker
            position={{lat: 37.759703, lng: -122.428093}} />
          <Marker /></Map>
      </div>)
}export default GoogleApiWrapper({
  apiKey: (YOUR_GOOGLE_API_KEY_GOES_HERE)
})(BlogMap)
The basic way of rendering a default marker with ‘google-maps-react’ is implementing a simple Marker component as a prop to the Map component. This method is perfectly fine for rendering a few markers, and you can even render many markers at a time by mapping over an array of marker data:
使用“ google-maps-react”呈现默认标记的基本方法是实现一个简单的Marker组件作为Map组件的道具。 此方法非常适合渲染一些标记,甚至可以通过映射标记数据数组来一次渲染许多标记:
{this.markerData.map((marker)=>{
return <Marker
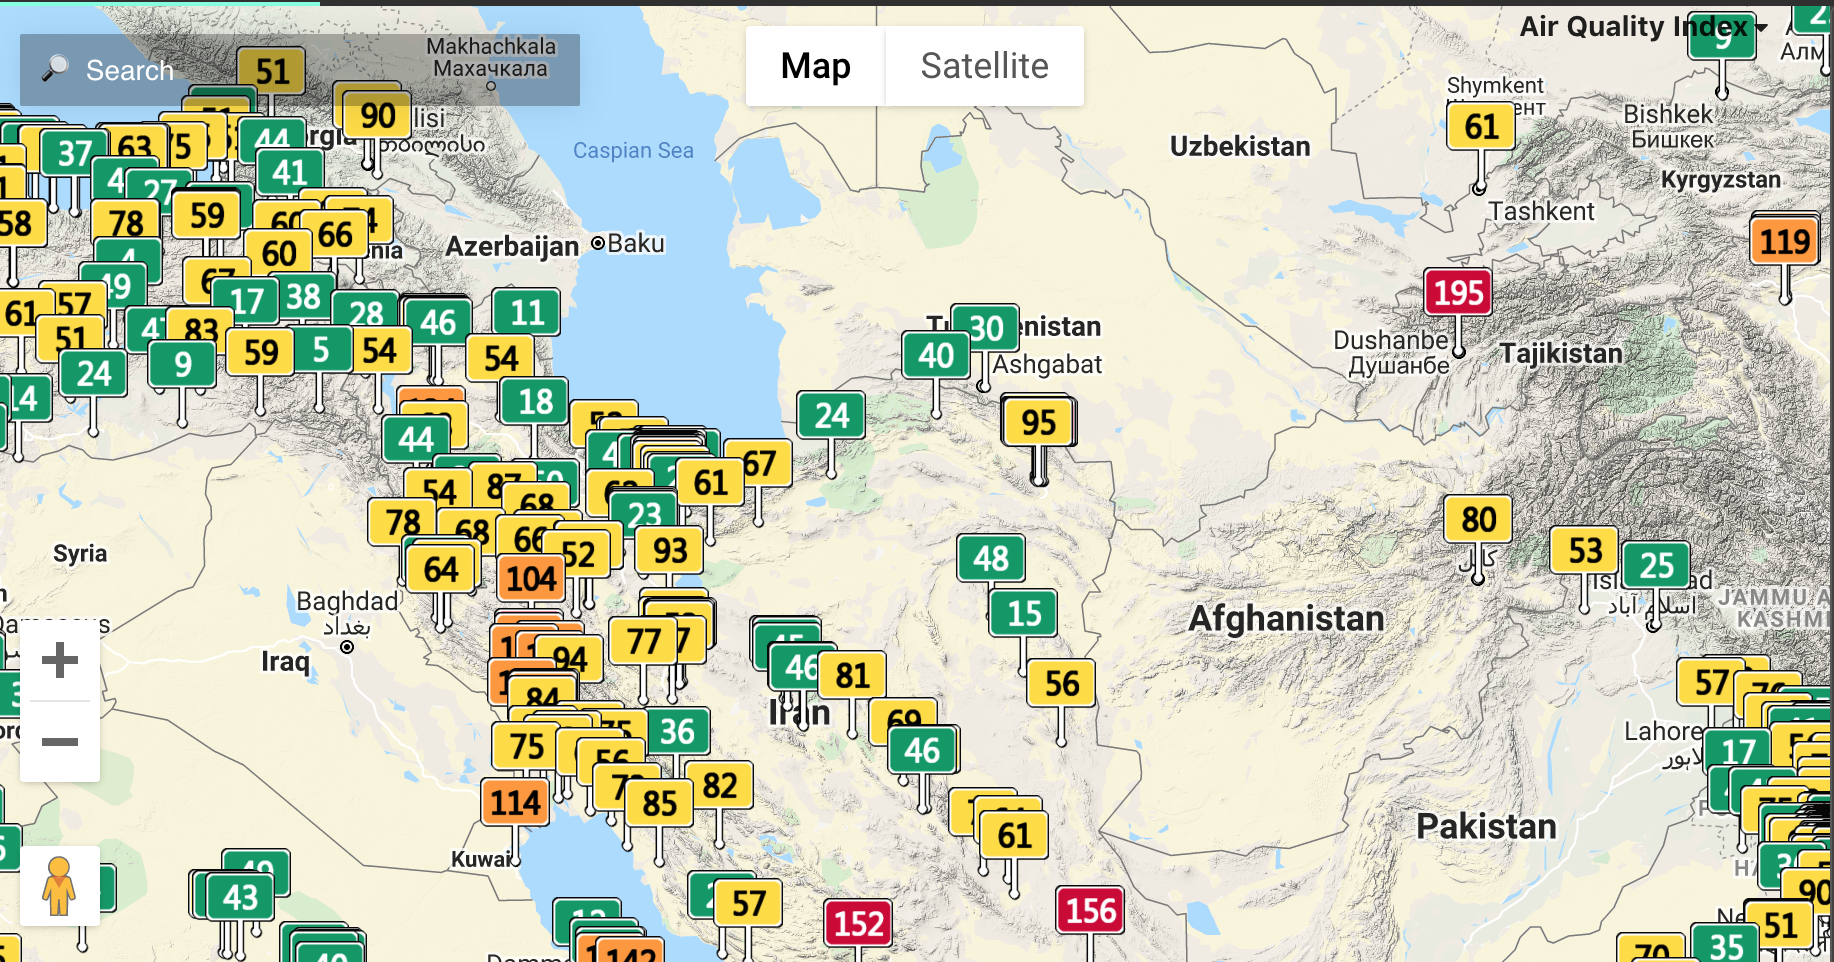
position={{lat: marker.lat, marker.lng}} />})}As props, we can customize this default marker by changing the icon to any image we want. Below is the custom icon setup for clyma, which sets each marker to a unique image url for the corresponding air quality index score. Note that the anchor point, size, and scaled sizes for the custom icon need to be set according to the dimensions of the icon image file. Other information such as ‘id’ and event handlers are passed to each Marker component as well.
作为道具,我们可以通过将图标更改为所需的任何图像来自定义默认标记。 以下是clyma的自定义图标设置,该设置将每个标记设置为对应的空气质量指数得分的唯一图像url。 请注意,需要根据图标图像文件的尺寸设置自定义图标的锚点,尺寸和缩放尺寸。 其他信息(例如“ id”和事件处理程序)也传递到每个Marker组件。
<Marker
  info={statObj}
  position={{ lat: statObj.lat, lng: statObj.lon }}
  id={statObj.uid}
  onMouseover={this.props.mouseEnterHandler}
  onMouseout={this.props.mouseLeaveHandler}
  {...this.props}
  icon={{
    url: `https://waqi.info/mapicon/${statObj.aqi}.30.png`,
    anchor: new google.maps.Point(iw / 4, ih / 2 - 5),
    size: new google.maps.Size(iw / 2, ih / 2),
    scaledSize: new google.maps.Size(iw / 2, ih / 2),
  }}
/>
Excellent, now we have heaps of markers spread across our google map. However…every time that any piece of state is set or changed, the Map component will re-render. This is due to React’s life-cycle. In order to render thousands of markers while preventing re-rendering of said markers every time the map component re-renders, a pure component is recommended. This is because pure components do not depend on or modify the state of any variables which are outside of their scope. A Pure Component has an automatic ‘shouldComponentUpdate’ method which does a shallow comparison on the state/prop data. If the Marker data has not changed(the previous state and props data is the same as the next state and props), then the component will not re-render. Setting up a pure component is a cinch!
太好了,现在我们在Google地图上分布了很多标记。 但是……每次设置或更改任何状态时,Map组件都会重新渲染。 这是由于React的生命周期。 为了渲染成千上万个标记,同时防止每次重新渲染地图组件时都重新渲染所述标记,建议使用纯组件 。 这是因为纯组件不依赖或修改超出其范围的任何变量的状态。 纯组件具有自动的“ shouldComponentUpdate”方法,该方法对状态/属性数据进行浅表比较 。 如果标记数据未更改(先前状态和道具数据与下一状态和道具相同),则组件将不会重新渲染。 设置一个纯组件很容易!
Below is the structure of the pure component I used to render around 10,000 data points across a google map with a custom icon for each map marker. In this example, I am using Redux to access the map marker data.
以下是我用来在整个Google地图上呈现约10,000个数据点的纯组件的结构,每个地图标记都有一个自定义图标。 在此示例中,我使用Redux访问地图标记数据。
import React, { PureComponent } from "react";
import { connect } from "react-redux";
import { Marker } from "google-maps-react";class Markers extends PureComponent {
  render() {
    const google = this.props.google;
    let iw = 70,
      ih = 94;
    return this.props.stats.map((statObj) => {
      if (statObj.aqi !== "-")
        return(
          <Marker
           info={statObj}
           position={{ lat: statObj.lat, lng: statObj.lon }}
           id={statObj.uid}
           onMouseover={this.props.mouseEnterHandler}
           onMouseout={this.props.mouseLeaveHandler}
           {...this.props}
           icon={{
            url: `https://waqi.info/mapicon/${statObj.aqi}.30.png`,
            anchor: new google.maps.Point(iw / 4, ih / 2 - 5),
            size: new google.maps.Size(iw / 2, ih / 2),
            scaledSize: new google.maps.Size(iw / 2, ih / 2),
          }}
        />);
    });
  }
}const mapStateToProps = (state) => {
  return {stats: state.stats};
};export default connect(mapStateToProps, null)(Markers);
To implement, simply import the pure component into your Map component:
要实现,只需将纯组件导入到Map组件中:
import Markers from "./Markers";
import React, { Component } from "react";
import {Map, GoogleApiWrapper} from 'google-maps-react';export class BlogMap extends Component {render(){
    return(
      <div>
        <Map
          google={this.props.google}
          initialCenter={{
            lat: 40.854885,
            lng: -88.081807
          }}
          zoom={15}
        >
          <Markers
            onMouseover={this.mouseEnterHandler}
            onMouseout={this.mouseLeaveHandler}
          /></Map>
      </div>)
}export default GoogleApiWrapper({
  apiKey: (YOUR_GOOGLE_API_KEY_GOES_HERE)
})(BlogMap)
Success! Users can now browse around the google map and interact with any custom map marker fluidly and seamlessly. The map component may be constantly re-loading, but the markers themselves will not bog down the functionally of the map’s features with thousands of individual renders.
成功! 用户现在可以浏览google地图,并与任何自定义地图标记流畅且无缝地进行交互。 地图组件可能会不断重新加载,但是标记本身不会在功能上陷入成千上万个单独渲染的地物特征的困境。
Hopefully this technique may help some of you struggling to render large numbers of custom map markers. Please feel free to contact me any time for questions or help: linkedin | twitter | email | github | portfolio
希望这项技术可以帮助某些人努力渲染大量的自定义地图标记。 如果有任何问题或帮助,请随时与我联系: linkedin | 推特 | 电邮 | github | 作品集
翻译自: https://medium.com/swlh/dynamically-render-10-000-custom-markers-on-a-google-map-with-react-js-d662450f4648
react自定义属性渲染
相关文章

java后台代码延时执行_java 实现定时的方法及实例代码
java学懵_刚开始学Web前端,学的挺懵的,该怎么学呢,有什么建议?
Java中常量可以赋给对象吗_Java中用字符串常量赋值和使用new构造String对象的区别...
javascript 代理_在javascript中使用代理
节点日志_您的节点应用程序的az日志记录
react 组件中使用组件_使用具有React功能组件的道具儿童

java图片 圆角矩形_用JAVA awt实现Image Asset Studio生成圆形或圆角矩形图片功能