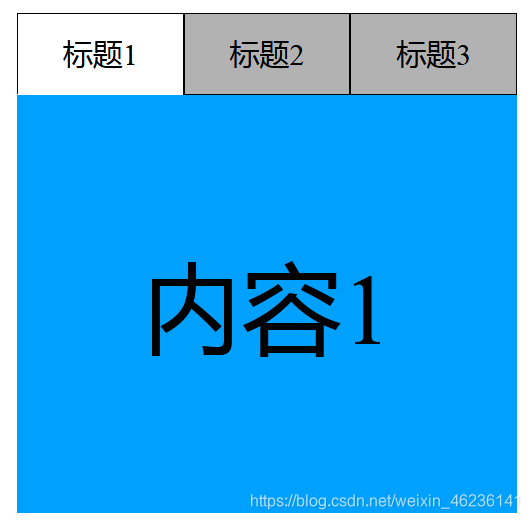
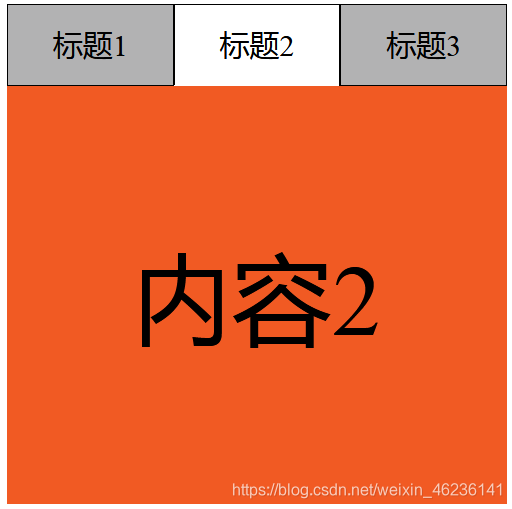
在开始写我们的选项卡之前,先来看一下最终实现的大概效果:

那废话不多说,接下来就看看如何去实现这个效果。
首先,利用我们的 html 和 css 基础,写出选项卡的基本布局:
html代码:
<div class="news">
	<ul>
		<li class="active">标题1</li>
		<li>标题2</li>
		<li>标题3</li>
	</ul>
	<ol>
		<li class="active">内容1</li>
		<li>内容2</li>
		<li>内容3</li>
	</ol>
</div>
css样式:
body,div,ul,ol,li{
    margin: 0;padding: 0;
    list-style: none;
}
body{
    position: relative;
}
.news{
    width: 500px;
    height: 500px;
    position: absolute;
    left: 50vw;
    top: 50vh;
    transform: translate(-50%,-50%);
    display: flex;
    flex-direction: column;
}
.news ul{
    width: 100%;
    display: flex;
}
.news ul li{
    flex-grow: 1;
    border: solid black 1px;
    background-color: #b2b2b3;
    font-size: 30px;
    height: 80px;
    text-align: center;
    line-height: 80px;
    cursor: pointer;
}
.news ol{
    flex-grow: 1;
    position: relative;
}
.news ol li{
    width: 100%;
    height: 100%;
    font-size: 100px;
    display: none;
    justify-content: center;
    align-items: center;
    position: absolute;
    top: 0;
    left: 0;
}
.news ol li:nth-of-type(1){
    background-color: #00a0ff;
}
.news ol li:nth-of-type(2){
    background-color: #f15a23;
}
.news ol li:nth-of-type(3){
    background-color: #f5a2c0;
}
.news ul li.active{
    background-color: #fff;
    border-bottom-color: #fff;
}
.news ol li.active{
    display: flex;
}
接下来引入JavaScript代码,实现动态切换效果:
javascript">var title = document.querySelectorAll('ul li');
var content = document.querySelectorAll('ol li');

title.forEach(function (item,key) {
    item.onclick = function () {
        title.forEach(function (i,k) {
            i.className = '';
            content[k].className = '';
        });
        item.className = 'active';
        content[key].className = 'active';
    }
})
这里我们使用两个 forEach 对获得的 li 标签的伪数组进行循环遍历,在点击事件内首先将两个列表中的li标签的 class 名全部清空,然后点击那个标签给哪个标签加上 class 名,并绑定对应的内容li。
当然,这里我们做的是点击事件,就是点击切换选项卡,也可以改为鼠标移入事件,就是鼠标移到标题的 li 标签上时自动切换,这里只需改变 js 代码中的事件:
javascript">// 这样我们就把点击事件改为鼠标移入事件了
item.onclick    =>    item.onmouseover
虽然样式做了一大堆花里胡哨的,但是关键还是在这短短几行 js 代码中,怎么样,是不是很容易就实现 选项卡的效果了:)


